Jul 17, 2013

Performance and Diagnostics Hub in Visual Studio 2013

Performance and Diagnostics Hub in Visual Studio 2013


The new Performance and Diagnostics hub in Visual Studio 2013 Preview provides a unified experience for various tools available in Visual Studio. The hub also makes it easy to identify the performance and diagnostic tools that work with your project and enables you to quickly start using them to improve your application.


How to Access from Visual Studio 2013:
It can be opened by clicking on “Performance and Diagnostics” from the Debug or Analyze menu.

New and Improved Profiling Tools

In this release we have not only moved our existing profiling tools into the hub, but also added some new ones along the way! Among the various profiling targets, you will see the following tools available in Visual Studio 2013:
  • JavaScript Memory. First introduced in Visual Studio 2012 Update 1, this tool helps you understand memory usage and find memory leaks in JavaScript Windows Store apps. For more information, be sure to check out JavaScript memory analysis for Windows Store apps in Visual Studio 2012.
  • HTML UI Responsiveness. First introduced in Visual Studio 2012 Update 2, this tool helps you isolate UI responsiveness problems in JavaScript Windows Store apps by providing rich visualizations of work being done on the UI thread. For more information, be sure to check out HTML UI Responsiveness tool in Visual Studio 2013.
  • XAML UI Responsiveness. New in Visual Studio 2013, this tool helps you understand UI responsiveness problems in C#/XAML and C++/XAML Windows Store apps by providing rich visualizations of work being done on the UI thread. For more information, be sure to check out XAML UI Responsiveness tool in Visual Studio 2013.
  • Energy Consumption. New in Visual Studio 2013, this tool enables you to estimate your app’s energy consumption without the need for any specialized hardware. For more information, be sure to check out Energy Consumption tool in Visual Studio 2013.
Download: Channel9 MP3


Jul 16, 2013

Productivity Power Tools and Commands

Productivity Power Tools 2010


Features:

Enhanced Scrolling
Middle-Click Scrolling
Organize Imports for Visual Basic
Solution Navigator
Tab Well UI - Allows you to completely customize the behaviour of your document tabs.
Searchable Add Reference Dialog
Quick Access - Quick Access is a new tool window that allows users to search for and execute common tasks within the Visual Studio IDE. 
Auto Brace Completion
HTML Copy 


Productivity Power Tools 2012


Features:

Quick Tasks
Power Commands
Color Printing
Enhanced Scrollbar
Middle-Click Scrolling 
Organize Imports for Visual Basic
Custom Document Well
Tools Options Support
Auto Brace Completion
HTML Copy
Fix Mixed Tabs
Ctrl + Click Go To Definition
Align Assignments
Move Line Up/Down Commands
Column Guides
Colorized Parameter Help


PowerCommands for Visual Studio 2010

Download PowerCommand from here.


Features:


Format document on save / Remove and Sort Usings on save
The Format document on save option formats the tabs, spaces, and so on of the document being saved. It is equivalent to pointing to the Edit menu, clicking Advanced, and then clicking Format Document. The Remove and sort usings option removes unused using statements and sorts the remaining using statements in the document being saved.

Clear All Panes
This command clears all output panes. It can be executed from the button on the toolbar of the Output window.

Copy Path
This command copies the full path of the currently selected item to the clipboard. It can be executed by right-clicking one of these nodes in the Solution Explorer: The solution node; A project node; Any project item node; Any folder.

Email CodeSnippet
To email the lines of text you select in the code editor, right-click anywhere in the editor and then click Email CodeSnippet.

Insert Guid Attribute
This command adds a Guid attribute to a selected class. From the code editor, right-click anywhere within the class definition, then click Insert Guid Attribute.

Show All Files
This command shows the hidden files in all projects displayed in the Solution Explorer when the solution node is selected. It enhances the Show All Files button, which normally shows only the hidden files in the selected project node.

Undo Close
This command reopens a closed document , returning the cursor to its last position. To reopen the most recently closed document, point to the Edit menu, then click Undo Close. Alternately, you can use the CtrlShiftZ shortcut.


Collapse Projects
This command collapses a project or projects in the Solution Explorer starting from the root selected node. Collapsing a project can increase the readability of the solution. This command can be executed from three different places: solution, solution folders and project nodes respectively.

Copy Class
This command copies a selected class entire content to the clipboard, renaming the class. This command is normally followed by a Paste Class command, which renames the class to avoid a compilation error. It can be executed from a single project item or a project item with dependent sub items.

Paste Class
This command pastes a class entire content from the clipboard, renaming the class to avoid a compilation error. This command is normally preceded by a Copy Class command. It can be executed from a project or folder node.

Copy References
This command copies a reference or set of references to the clipboard. It can be executed from the references node, a single reference node or set of reference nodes.

Paste References
This command pastes a reference or set of references from the clipboard. It can be executed from different places depending on the type of project. For CSharp projects it can be executed from the references node.

Copy As Project Reference
This command copies a project as a project reference to the clipboard. It can be executed from a project node.

Edit Project File
This command opens the MSBuild project file for a selected project inside Visual Studio. It combines the existing Unload Project and Edit Project commands.

Open Containing Folder
This command opens a Windows Explorer window pointing to the physical path of a selected item. It can be executed from a project item node

Open Command Prompt
This command opens a Visual Studio command prompt pointing to the physical path of a selected item. It can be executed from four different places: solution, project, folder and project item nodes respectively.

Unload Projects
This command unloads all projects in a solution. This can be useful in MSBuild scenarios when multiple projects are being edited. This command can be executed from the solution node.

Reload Projects
This command reloads all unloaded projects in a solution. It can be executed from the solution node.

Remove and Sort Usings
This command removes and sort using statements for all classes given a project. It is useful, for example, in removing or organizing the using statements generated by a wizard. This command can be executed from a solution node or a single project node.

Extract Constant
This command creates a constant definition statement for a selected text. Extracting a constant effectively names a literal value, which can improve readability. This command can be executed from the code editor by right-clicking selected text.

Clear Recent File List
This command clears the Visual Studio recent file list. The Clear Recent File List command brings up a Clear File dialog which allows any or all recent files to be selected.

Clear Recent Project List
This command clears the Visual Studio recent project list. The Clear Recent Project List command brings up a Clear File dialog which allows any or all recent projects to be selected.

Transform Templates
This command executes a custom tool with associated text templates items. It can be executed from a DSL project node or a DSL folder node.

Close All
This command closes all documents. It can be executed from a document tab.


Visual Studio 2013 New Editor Features


Peek Definition
Peek Definition is one such feature that allows you to view definitions inline in the Editor without having to open a new document tab. To see it in action, right click on a symbol and click on the “Peek Definition” command in the context menu or invoke the keyboard shortcut Alt + F12.

Enhanced Scrollbar
The Enhanced Scrollbar has been one of the most popular Productivity Power Tools extensions and is now part of the Visual Studio 2013 product! The Enhanced Scrollbar provides you visual cues about your file on the vertical scrollbar. Markers on the scrollbar allow you to quickly view the location of errors, warnings, breakpoints, bookmarks, find results and other useful information in your file. Here, too, we focus on bringing information to your fingertips – you don’t have to scroll away from your current position to get information about other parts of your file.


Map Mode
Microosoft added a “Map mode” to the scrollbar which gives you some cool features, each of which you can customize:
  1. 10,000 feet view of the code – a high level view of the code is overlaid on the scrollbar helping you understand the structure of the code in a glance.
  2. Single click to scroll – clicking on any region of the scrollbar immediately takes you to that location in the file – this is a quick way to get to any location in your file.
  3. Preview of a section of your file – hovering on any section of the scrollbar show a live preview of that part of the file inside a tooltip. This is handy when examining interesting parts of your file
Navigate To (Ctrl+,)
Using the new Navigate To, you type in any part of a symbol and can find its definition, using smart semantic search. You can also type in part of a file name in your solution and quickly switch to it, regardless of whether or not it was previously open.

Auto Brace Complete
The Auto brace complete feature automatically adds closing parenthesis, quotes, braces and brackets for you as you type code in the Editor. This was one of the popular Productivity Power Tools Features that we decided to include in the Visual Studio 2013.

Move Line Up/ Down (Alt Arrow-Up/ Arrow-Down)
Move Line Up/ Down feature allows you to quickly move single or multiple lines up and down using the keyboard shortcut Alt + Up Arrow and Alt + Down Arrow. This was another popular extension from Productivity Power Tools that we decided to bring forward for this release.

New IDE Features for JavaScript
In JavaScript, we added identifier highlighting - now when you select an identifier, such as a variable name or function call, references to it are highlighted in the current source file. We also added a new navigation bar that appears at the top of the editor window so you can more easily move through the primary functions and objects in your JavaScript source.

You can find complete list here.


Jul 15, 2013

Custom Encryption of connection strings in Configuration files using Certificates


This article will explain how to implement custom encryption of connection strings in configuration files using certificates for security reasons.

In most of the applications, connection strings will be mentioned encrypted format in configuration files. To provide more security to the applications we can use custom encryption using certificates. This will provide more security to the applications.

Steps:
  • Generate the certificate using the following command which will also store the certificate under the Current User - Personal store
    • Command to generate the test certificate :
    • makecert -r -pe -n "CN=CSProtectedConfigCertificate" -b 01/01/2000 -e 01/01/2036 -eku 1.3.6.1.5.5.7.3.1 -ss my -sr CurrentUser -sky exchange -sp "Microsoft RSA SChannel Cryptographic Provider" -sy 12
  • Create a Custom Library project in Visual Studio and add this certificate to the project.
  • Create class and implement methods for Encrypting and Decrypting similar to this link.
  • Build this solution and register the DLL in GAC using Visual Studio Command Prompt

gacutil.exe -i CustomProtectedConfigurationProvider.dll
  • Update below configuration details in machine.config or web.config:

CertificateName="CSProtectedConfigCertificate"   type="CustomProtectedConfigurationProvider.CustomProtectedConfigProvider,                   CustomProtectedConfigurationProvider, Version=1.0.0.0, Culture=neutral,PublicKeyToken=e03f7ad78f283bbf,processorArchitecture=MSIL"
   />


  • Execute below commands for encrypting and decrypting connection strings which is used in configuration file:
    • Command for Encrypting connection string (this will encrypt connection string in configuration file):
    • aspnet_regiis -pe "connectionStrings" -prov "CustomProtectedConfigurationProvider" -pkm

    • Command for decrypting connection string(this will decrypt connection string in configuration file:
    • aspnet_regiis -pd "connectionStrings" -pkm


Jul 10, 2013

Portable Class Libraries in .Net


The Portable Class Library project enables you to write and build managed assemblies that work on more than one .NET Framework platform. You can create classes that contain code you wish to share across many projects, such as shared business logic, and then reference those classes from different types of projects.

Using the Portable Class Library project, you can build portable assemblies that work without modification on the .NET Framework, Silverlight, Windows Phone 7, or Xbox 360 platforms. Without the Portable Class Library project, you must target a single platform and then manually rework the class library for other platforms. The Portable Class Library project supports a subset of assemblies from these platforms, and provides a Visual Studio template that makes it possible to build assemblies that run without modification on these platforms.


Note: Portable Class Libraries are now built into Visual Studio 11. For Visual Studio 2010 one needs to install this add-in from Visual Studio Gallery.

Reference: 


TypeScript

TypeScript is a free and open source programming language developed by Microsoft. It is a strict superset of JavaScript, and essentially adds optional static typing and class-based object oriented programming to the language. Anders Hejlsberg, lead architect of C#, has worked on development of TypeScript.

TypeScript is a language for application-scale JavaScript development. TypeScript is a typed superset of JavaScript that compiles to plain JavaScript.Any browser. Any host. Any OS. Open Source.

TypeScript supports header files which add type information to existing JavaScript libraries, extending its benefits to popular libraries like jQuery, MongoDB, Node.js, and D3.js.


TypeScript is a language extension that adds features to JavaScript.
  • Type annotations and compile-time type checking
  • Classes
  • Interfaces
  • Modules
  • Abbreviated "arrow" syntax for anonymous functions

Jul 9, 2013

Behavior Driven Development with SpecFlow


Behavior Driven Development with SpecFlow:

Introduction:

This white paper explains how to use SpecFlow & WatiN in Behavior Driven Development (BDD). BDD has been embraced by many developers helping them keep focused on the business value of the software they create while at the same time covering their code with tests. This has been a challenge with .NET - the tools haven't been that expressive. That's changing with SpecFlow
BDD is all about implementing an application by describing it from the point of view of its stakeholders.
Behavior-driven development is an “outside-in” methodology. It starts with at the outside by identifying business outcomes, and then drills down into the feature set that will achieve those outcomes. Each feature is captured as a “story”, which defines the scope of the feature along with its acceptance criteria

Objective:

This article describes the way to address the gap between business users and developers by doing development which directly translates the business expectations
Using SpecFlow we can bridge gap between business users and developers. Business users will write the specifications/feature which will be further implemented by developers in the form of test cases. Developers will use these test cases to test the application code
WatiN was used to test the User Interface. Using this we can test controls values in controls and validations. WatiN is developed in C# and aims to bring us an easy way to automate our tests with Internet Explorer and Firefox using .Net. It supports AJAX testing as well


Scope:

This whitepaper will cover two scenarios on how to use SpecFlow and WatiN to implement BDD.

Acronyms and Definitions:


Definition/Acronym
Explanation
SME
Subject Matter Expert
SpecFlow
SpecFlow is a .Net library that allows us to describe user expectations in a consistent Domain-Specific Language that can be wired for automatic execution. By writing executable tests in a human readable manner, these tests can serve as a bridge between the users expectations and the code we produce to meet them.
WatiN
WatiN stands for Web Application testing in .NET, and it's a framework that enables web application testing through Internet Explorer and other browsers. WatiN is developed in C# and aims to bring an easy way to automate your tests with Internet Explorer and Firefox using .Net.
User Story
A User story is a high level description of system behavior, used as a planning tool. Stories are vertical slices of system functionality that are deliverable independently. Each story should specify the value it brings to one or more stakeholders, the stakeholders that care about the story and the scope of the intended work.
Feature File
A Feature file describes a feature or a part of a feature with representative examples of expected outcomes. SpecFlow uses these files to validate some system functionality against its specifications.
Scenario
A Scenario captures one key example for a feature in the feature file. It represents a way that the system delivers some value to a stakeholder. Scenarios are units of specifications for SpecFlow.
Steps
Steps are domain language phrases that we can combine to write scenarios. They can either refer to the context of a scenario, an action that the scenario describes or a way to validate the action.


Business Challenges:


Due to disconnect between the developers & SME’s because of less documentation of functional requirements, business was not able to understand and approve the unit tests written by developers as they were purely technical. SME wanted tests which can co-relate with the functionality of the application.

Solution:

Technology Landscape


Platforms / Environments
Visual Studio 2010

Framework/IDE
.Net Framework 4.0

UI
ASP.Net MVC

Application Server
IIS

Tools
SpecFlow, WatiN

Automation Testing
MSUnit

Browsers
IE, Firefox


Design Approach


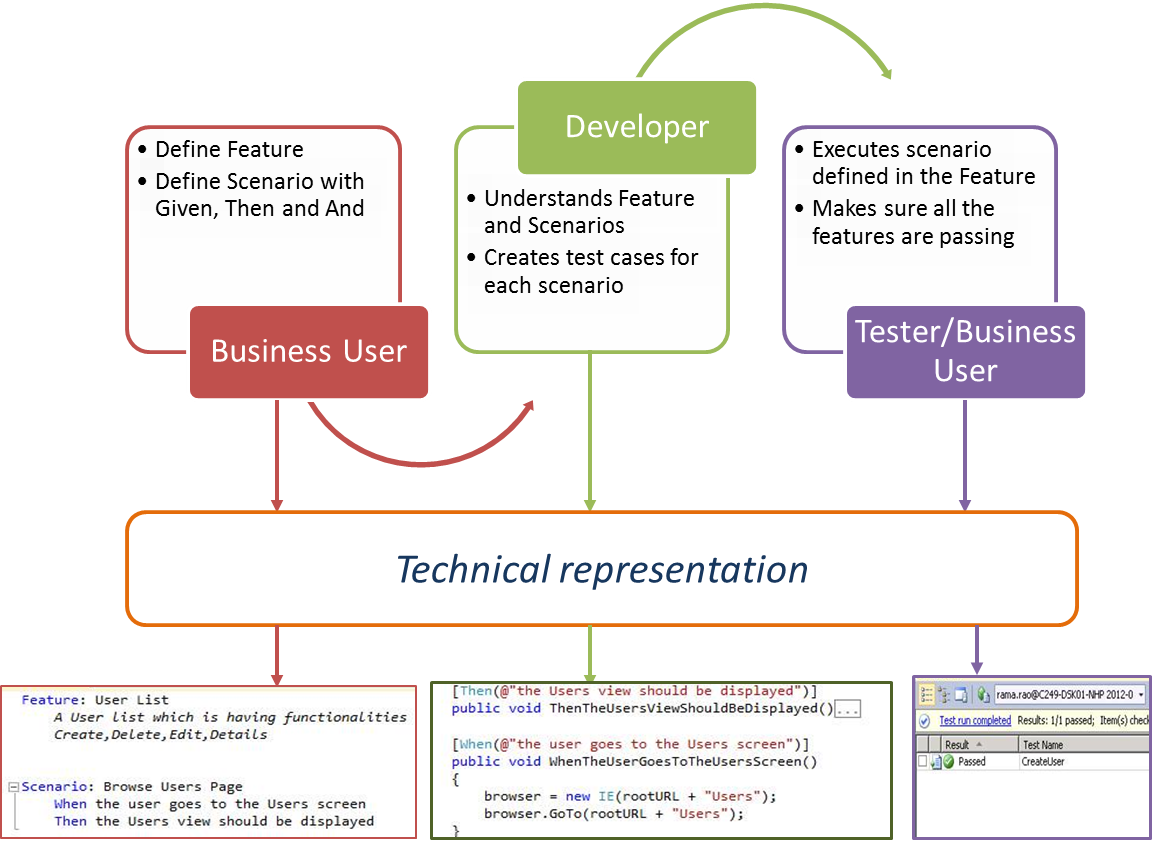
Business User/stakeholders will represent the business functionality in the form of Feature and Scenarios. Business user will share the feature file with developers. Developers will understands and implement domain functionality for that feature.
Business Users will execute these scenarios and makes sure all features and scenarios are passed. Below is high level flow chart which explain the flow from business users and how it translates till the developer


Figure: High-level flow from business users to testers

Implementation Approach


BDD based unit test were implemented using SpecFlow and WatiN which translates the business functionalities in the form of unit tests.


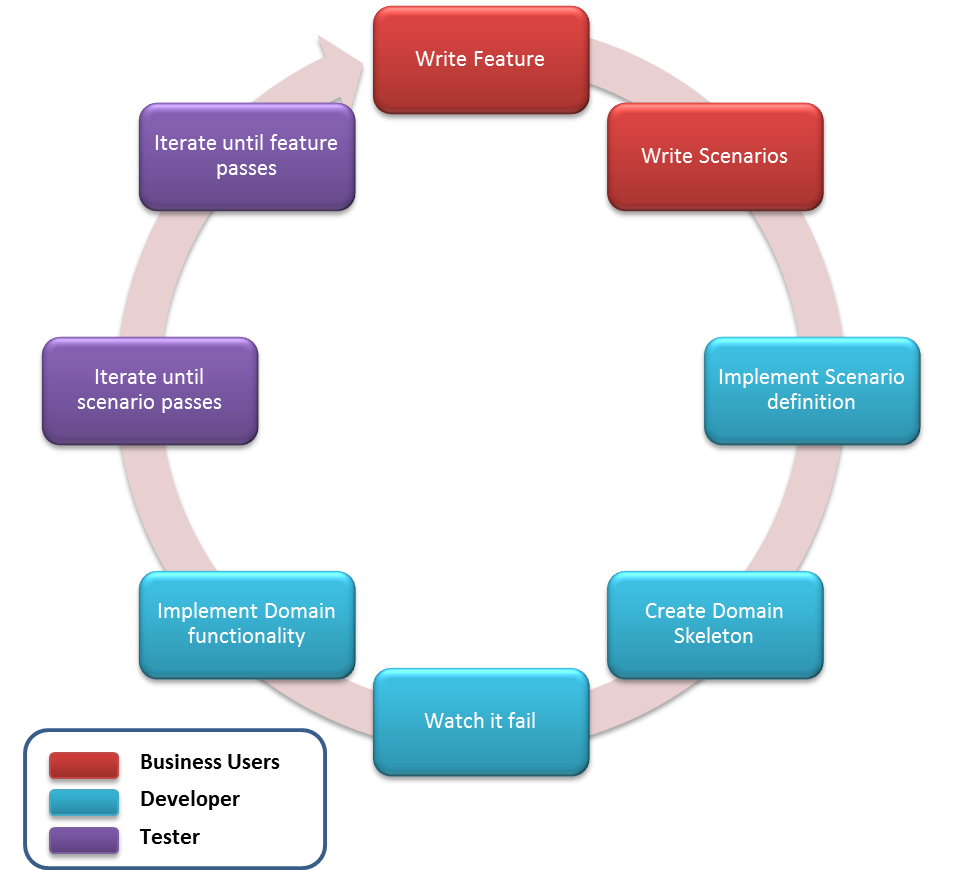
Figure: Feature-to-unit Test Process


Let us take two business scenarios to understand SpecFlow and WatiN.
First scenario, create test scenario for login page including negative test scenario also.
Second scenario, get the Partner details based on LenderId. Partner details should be loaded from excel file before executing the scenario. Data should be deleted after execution of test cases.
First Scenario:
Create a new ASP.NET MVC application with a unit test project. In the MSUnit project, add a feature file to the unit test project.
Figure: Add new feature file
Feature file contains Feature and a sample Scenario. Modify the feature file as per requirements. Notice that the file is created with a .feature extension and that Visual Studio recognizes this as a supported file. You may also notice that your feature file has a related .cs code-behind file. Each time you save a .feature file, SpecFlow parses the file and converts the text in that file into a test fixture. The code in the associated .cs file represents that test fixture, which is the code that’s actually executed each time you run your test suite.
Figure: Users functionality feature which contains multiple scenarios
Create a class (.cs) file with same name as feature file and write the test cases. Mention Given, When, Then and And attributes before each test case to map test case with scenario in feature file.
Use WatiN to create IE object and invoke the browser. Using IE object, add test data into the controls and test the scenarios.
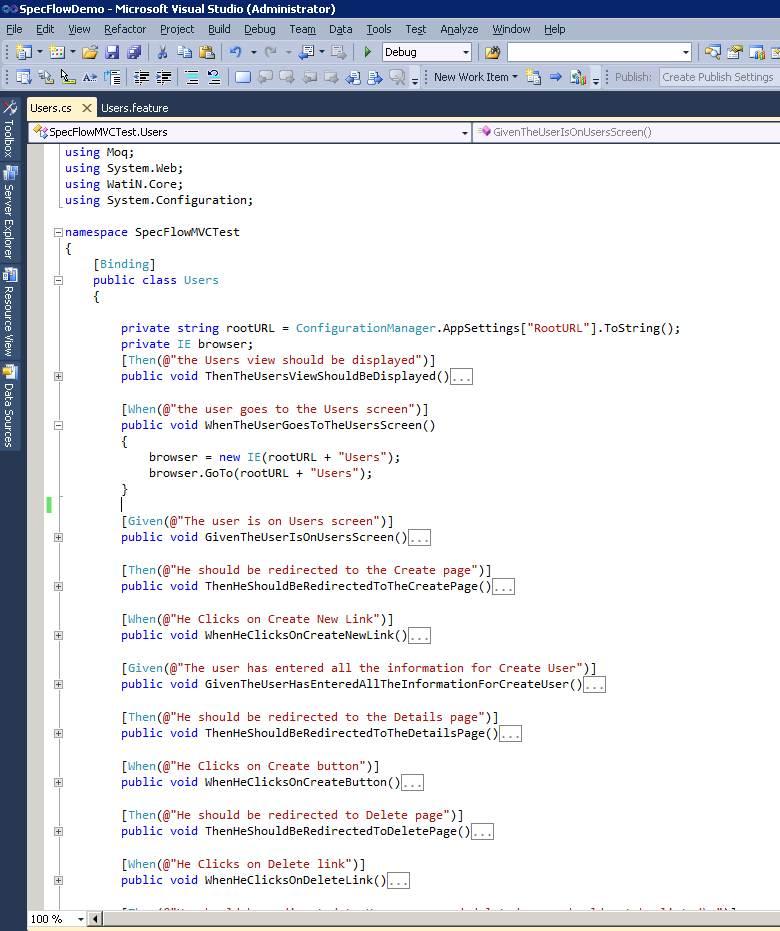
Figure: Code for Users Feature
Execute the test cases from the “Test View” window. You can choose to “Debug” or “Run” the selected test case(s).
Figure: Browser is opened and executing test case
“Test Results” windows will display the status of executed test cases.
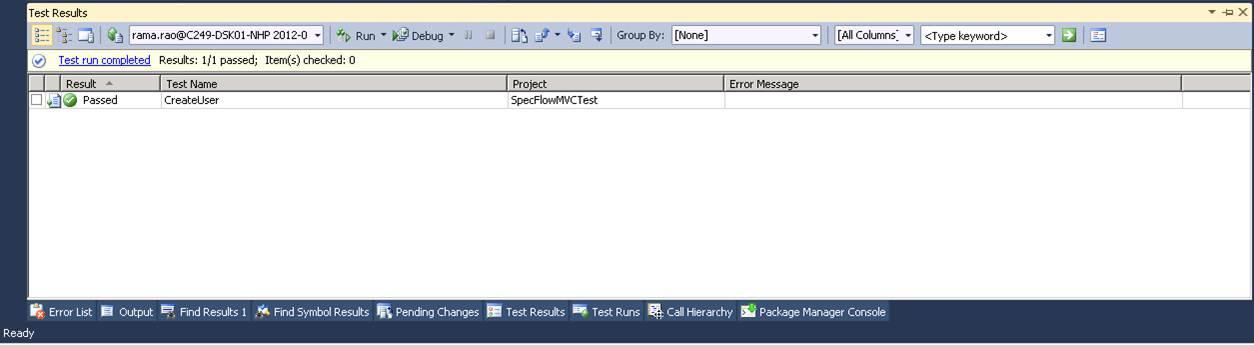
Figure: Test result window displaying the result of executed test case(s)
Second scenario:
Business Challenge: Retrieve the Partner details based on LenderId. LenderId value tends to change. Whenever LenderId record is deleted from database, then test case will fail.
Solution: Manually add the partner details and lender details in excel sheet. Read excel sheet data and insert records into the related tables before execution of test case. After completion of test case, delete the inserted records from the table.
Write a method to read excel sheet and mention BeforeScenario attribute. We can use various attributes like BeforeScenarioBlock, BeforeStep, BeforeFeature attributes to run method before test case executes.
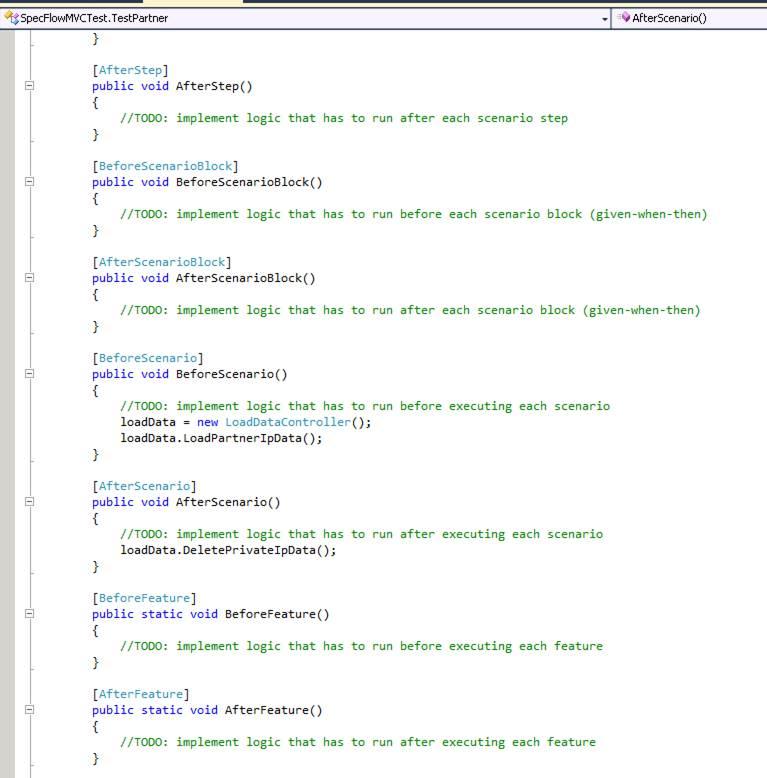
Write a method to read the data from database. Pass the LenderId and get the partner details. Write a method to delete the records from database and use AfterScenario attribute. This will run after test case execution.


Report Generation:
To generate report, we need to use command-line tool of SpecFlow.

Command: specflow.exe generateall SpecFlowDemo.SpecFlowMVCTest.csproj


Salient Features of the solution

  • Involves Business users/stakeholders in the process. This makes sure that requirements/features are clearly defined.
  • Constantly getting feedback from stakeholders reduces development time. This process makes sure that what we are developing is correct.
  • Helps us in catching regression issues when adding new functionality.
  • Uses SpecFlow and WatiN tools to create and execute test cases, both tools are easy to install and free of cost.
  • Both tools are integrated with Visual Studio. Able to debug feature from Visual Studio.


Setup & Configuration:

Install
Add References
  • Add reference of WatiN.Core.dll to unit test project
  • Add reference of TechTalk.SpecFlow.dll to unit test project


By default, SpecFlow uses NUnit as its test-runner, but it also supports MSTest with a simple configuration change.

Business Benefits:

Involving the test team and SpecFlow early in the planning process has a number of advantages.
First, having test involved in the planning stages could help give a different perspective. Are there key stories missing? What happens in the scenario is changed by doing X? Why do we need this story if we can already do this with the Y feature? A lot of these are questions that already may come up, but the extra diversity may get the team thinking about things earlier.
Next having test involved early potentially compresses the development time. Test can get a better understanding of the behavior, stub out tests, and then implement automation in parallel with development thus reducing the amount of time between dev code complete and story acceptance. Quality may increase since test will have better understand early and has more contexts around what expected behavior should look like (and also have more time to ask clarifying questions). Once SpecFlow gets mixed into the process, now the entire team can get good visibility into what the acceptance tests actually look like and give feedback to help increase the coverage in a language that everyone understands.
That last bit is the important part –anyone can easily understand what a particular test case is actually doing without having to bring up MSDN or decipher curly braces.

Pros and Cons:


Advantages of SpecFlow
  • Scenarios are basically UnitTests and can be run with your existing infrastructure.
  • Scenarios and steps are easily debuggable out of VisualStudio.
  • Integration in your continuous build should be a breeze, since the infrastructure to run unit-tests is most certainly there already.
  • Business specifications mapped to test names automatically (auto-generated)
  • Low entry cost, easy to get setup and going


Disadvantages of SpecFlow
  • Limited ability to share and collaborate with product owners and stakeholders since specifications is held in Visual Studio.
  • Specifications must be written in Gherkin language (given/when/then)
  • Specification maintenance must be done by staff comfortable with Visual Studio
  • It does not support as many languages as Cucumber
  • SpecFlow depends on a Unit-Test framework, and currently only NUnit and MSTest are supported.
  • Reporting in SpecFlow is not very sophisticated yet. Need to use command-line to generate the report.


Advantages of WatiN
  • Fast execution
  • Very good IE support. Can Attach and Detach from running instances. Can access native window handles etc.
Disadvantages of WatiN
  • Very little documentation.
  • No native XPath support
  • No out-of-the-box remote execution/grid based execution


Best Practices:

  • Feature Files Should Actually be Features, Not Entire Portions of an App
  • Organize Your Features and Scenarios with the Same Thought You Give to Organizing Your Code
  • Feature should be self-explanatory. Use descriptive title or tags to describe the feature.
  • Don’t get trapped in user interface details.
  • Make Scenarios Independent and Deterministic. Avoid writing features that are tightly coupled with code.
  • Write Scenarios for the Non-Happy-Path Cases As Well
  • Revisit, Refactor, and Improve Your Scenarios and Steps
  • Use Compound Steps to Build Up Your Feature
  • Avoid Using Conjunctive Steps: Each step should do one thing. You should not generally have step patterns containing “and.”
  • Don’t over specify examples in a single scenario.


References